Collecting Data In The Field
The mobile app is the primary tool for recording information in the field. When you use the mobile app to record some information, this adds a record (row) to one of the tables in the Ranch Table Manager.
Growing Season Records
The mobile app should be used to record the following information during the growing season:
| Record Name | Description |
|---|---|
| Herd Movement | Use this to record when you move a herd from one paddock to another. This record can optionally update the size of the herd. |
| Herd Size | Use this to record updates to the size of the herd. |
| Rainfall Data | Use this to record rainfall. |
| Vegetation Data | Use this to record information about vegetation when you are in the field. |
| Forage Carryover | Use this to record how much forage remains in each paddock at the end of the growing season. |
Dormant Season Records
The mobile app should be used to record the following information during the dormant season:
| Record Name | Description |
|---|---|
| Herd Movement | Use this to record when you move a herd from one paddock to another. This record can optionally update the size of the herd. |
| Herd Size | Use this to record updates to the size of the herd. |
| Forage Supplementation | Use this form to record when you add supplemental forage to a paddock through bulk feeding." |
How To Use The Mobile App To Record Information
Opening a Form
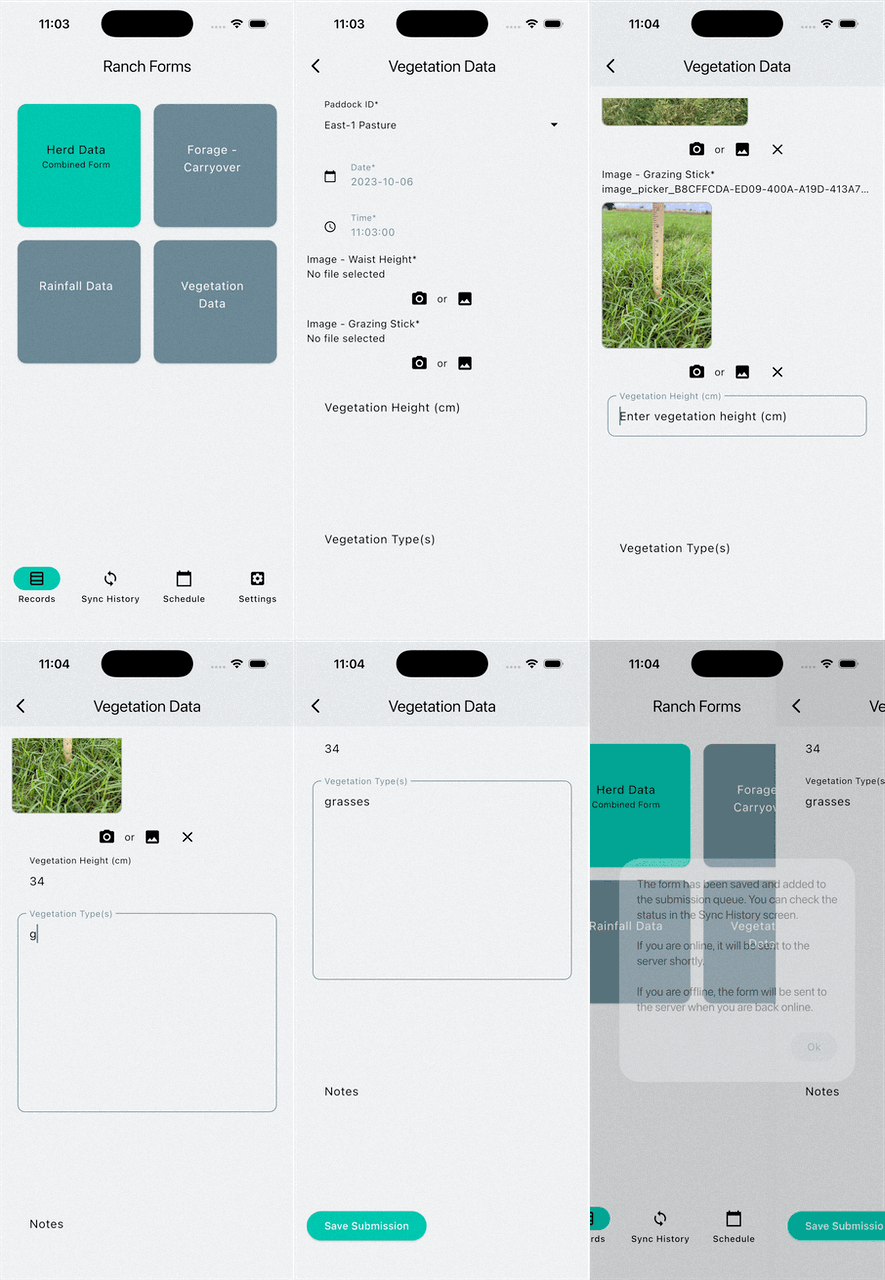
- Navigate to the "Records" tab
- Tap the desired form to open it (e.g., Herd Movement, Rainfall Data, Vegetation Data, etc.)
Filling in the Form
Forms may contain various types of fields:
- Text fields - Enter written information or notes
- Numerical fields - Enter counts, measurements, or calculations
- Date/Time fields - Tap to use current date/time or select different values
- Dropdown menus - Select from a list of predefined options by tapping the dropdown field. A searchable menu will appear where you can type characters to filter and narrow down the available options.
- Image fields - Capture new photos or attach existing photos as needed
Note: Fields marked with an asterisk (*) are required and must be completed before submission.
Submitting and Validating
- Review the form for completeness
- Fix any errors shown in red
- Tap "Submit" when all required fields are filled
Successful Submission
After successful submission:
- Confirmation message appears
- Form clears for next entry
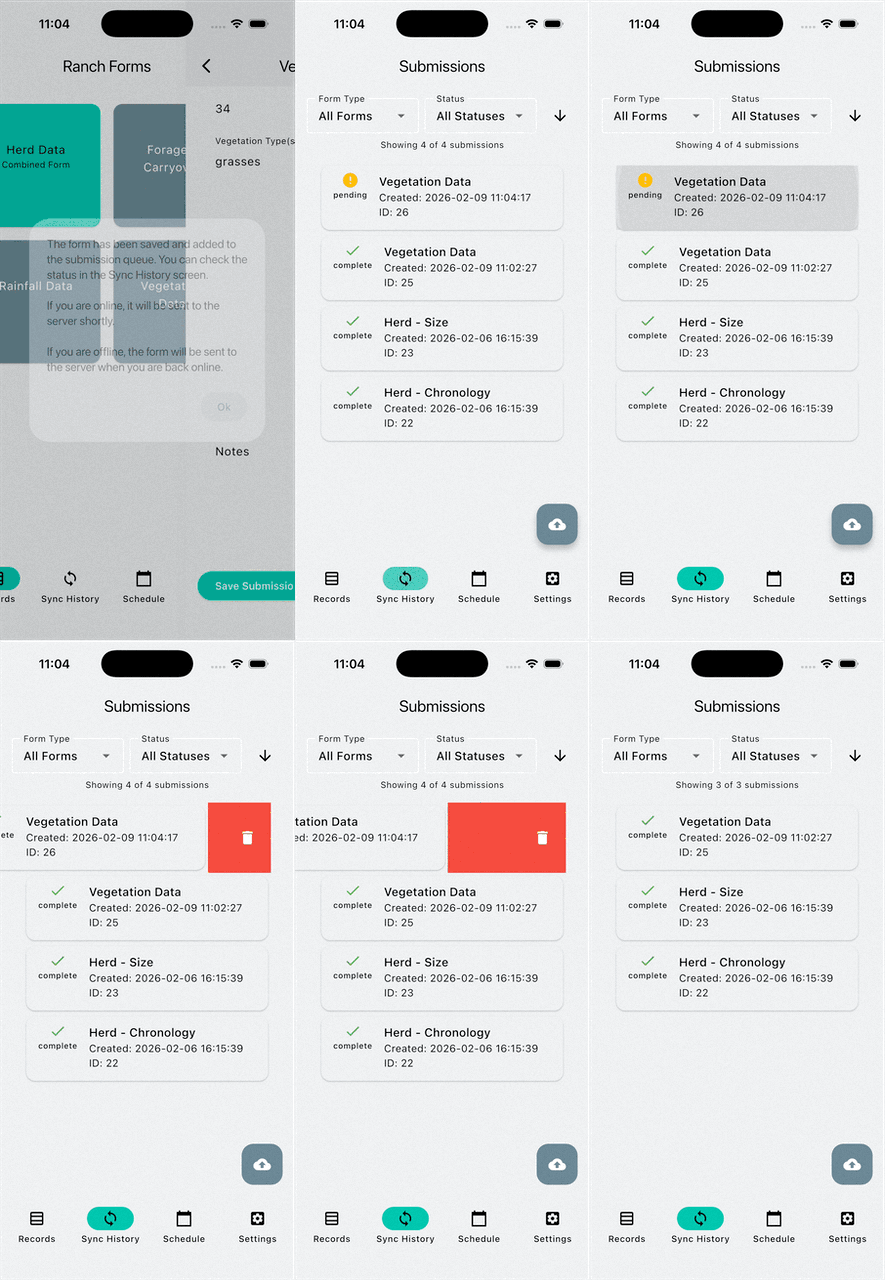
- Record appears in Sync History tab
- Data will automatically sync within 15 seconds to the web application when online.
Monitoring Sync Status
- Navigate to "Sync History" tab
- Check the status of each submission. Each entry displays one of the following statuses:
| Status | Description |
|---|---|
| Complete | Successfully uploaded to server |
| Pending | Waiting to upload |
| Error | Failed to upload |
Managing Submissions and Handling Sync Issues
Manage submissions interactively using these actions:
| Action | How To |
|---|---|
| View submission details | Tap on the entry |
| Force send or Retry submission | Swipe right on the entry |
| Delete submission | Swipe left on the entry |
Force Sending Submissions
Forcing a submission to send when the status is already complete may result in duplicate entries."
Troubleshooting Submission Errors
If a submission shows an error status:
- Check your connection - Verify your device has an active network connection
- Check API status - Navigate to Settings and scroll to the bottom to view API status indicators
- Wait and retry - Swipe right on the entry after a moment to retry the submission
- Review submission data - Tap the entry to check if all fields contain properly formatted information
- Submit a corrected form - If the data is invalid, create and submit a new form with the correct information